During a recent conversation, I was asked to briefly describe what two-factor authentication is, while keeping the technical bits at a minimum.
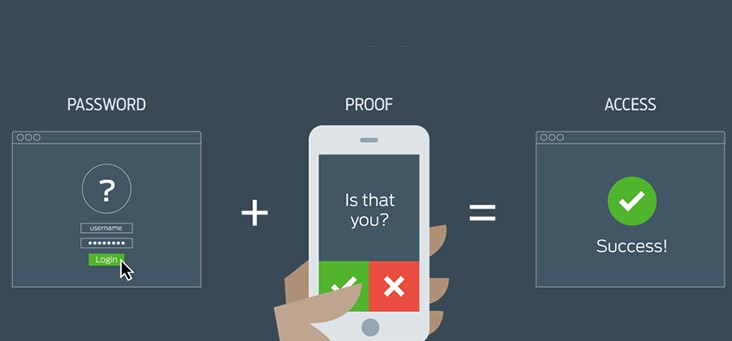
In the age of everything web, most of us have heard of two-factor authentication. Commonly referred to as 2FA or MFA, it simply is the composition of two secrets, one static and the other dynamic in nature, combined to establish a password that is almost impossible to guess or brute force.
Of course, there’s more to it than described above. The static secret is what we commonly use, combined with a username in most authentication mechanisms in the form of a login window. A username and a password to sign into a protected website.
This is where the dynamic part comes in play, converting an otherwise traditional authentication mechanism into a new level of authentication security.
When a web login is configured with 2FA/MFA, the login process is adjusted to accommodate a secondary validation, in most cases by an independent party, unrelated to the source of authentication validating the username and password. This is where “second factor” authentication comes from; it really means a secondary source of authentication, and validation of the party attempting to authenticate.
The secondary validation provider comes in many different forms such as a one-time code sent via email, text message (SMS) or generated using a device or a mobile app. This one time code is supplied during the authentication process confirming that the party attempting to login with the username and password is in fact an authorized party.
Some 2FA/MFA providers even include additional features such as a PUSH notification prompting the user on their smart phone or tablet to approve a login process, and in certain cases (not as common) a call-back number previously configured where the authenticating party will receive an automated voice call with an access code provided verbally.
All this may sound too complicated to some. However, in practice, it has proven to be much simpler to use than expected. Why is that?
For starters, due to the 2FA/MFA layer, the static password no longer has to be one of high complexity, allowing users to start using simpler passwords again.
Remember, the password by itself is no longer sufficient to process authentication, unless paired with a 2FA dynamic code. This means users can now have easier passwords to remember, and simply punch in a 6 digit code that is rendered on the screen of their phone, or better yet, simply tap “Allow” on a screen prompt.
Additionally, this renders the user’s credentials “hack” proof. With a properly implemented 2FA/MFA, even if the user’s username and password are compromised, without the second factor dynamic code, login will not work.
Also, as an added benefit to newer versions of 2FA/MFA providers, if the user has their 2FA/MFA configured with a PUSH notification, they will instantly know if there has been an unauthorized login attempt with their compromised credentials. In many cases, the 2FA/MFA app also provides means for the user to lock or deactivate their account directly via the app if there’s a reason to believe that a compromise has occurred.
Today, there are many businesses providing 2FA authentication as a service, simplifying implementation and reducing the overhead of maintaining and building such systems. Most Major players like Google, Facebook, Amazon have already bundled 2FA/MFA as part of their login process, meaning a user has to simply enable it and start using it.
Banks, credit companies and other financial institutions are also pushing forward to introducing 2FA/MFA into their login process. As a matter of fact, it is becoming a requirement by security compliance agencies and auditors.
We strongly recommend businesses to follow this trend and include a 2FA/MFA authentication mechanism to their web presence, their shopping carts and their user portals, providing their users with a higher level of security and the peace of mind, knowing their accounts are well protected.
We also encourage everyone out there to leverage 2FA/MFA as much as possible. We all have many logins to remember and work with: from our bank portals, to social media and email, we simply can’t afford the risk.
There are many 2FA/MFA management apps out there such as Duo, Google Auth, Authy …etc that allow a user to store and manage all of their 2FA/MFA entries. Most of these apps are compatible with majority of 2FA/MFA service providers.
If you’re on the edge about 2FA/MFA, just do it! the peace of mind is worth the extra 2 minutes it would take to enable it in your email or in many of the websites you use!


